Highlighting and Navigating an APEX Calendar with a Radio Group Item

Introduction
In this blog post, I'll show you how to integrate an APEX Calendar with a Radio Group item so users can easily select and highlight tour dates. When a user picks a date from the radio group, the calendar will automatically jump to and highlight that date.
Upload the provided SQL scripts into APEX using SQL Workshop > SQL Scripts, or your preferred method, and follow along if you’d like!
1. Creating the APEX Page with a Calendar Region
Steps to Create the Page:
Go to APEX Application Builder and create a new page.
Select the Calendar component and follow the setup wizard.
Choose SQL Query as the source and use the calendar query below:
 select e.tour_date_id as id,
        e.tour_date as start_date,
        case
          when count(b.booking_id) = 0 then 'All ' || e.capacity || ' slots remaining - Book now!'
          when count(b.booking_id) < e.capacity then 'Only ' || (e.capacity - count(b.booking_id)) || ' spots left, get in soon!'
          when count(b.booking_id) >= e.capacity then 'Fully booked!'
        end as title,
        case
          when count(b.booking_id) = 0 then 'apex-cal-blue'
          when count(b.booking_id) < e.capacity then 'apex-cal-green'
          when count(b.booking_id) >= e.capacity then 'apex-cal-red'
        end as color
   from exp_dates e
   left join exp_bookings b on e.tour_date_id = b.tour_date_id
  group by e.tour_date_id, e.tour_date, e.capacity;
Blue = No bookings yet.
Green = Some seats booked.
Red = Fully booked (excluded from results).
This ensures that only available tour slots appear in the calendar, we will show fully booked ones just to show a little more in our calendar, but ultimately we will not let the users select fully booked dates.
Finish creating the page.
Add static id my_calendar to the Calendar region. We will need this for our JavaScript later!
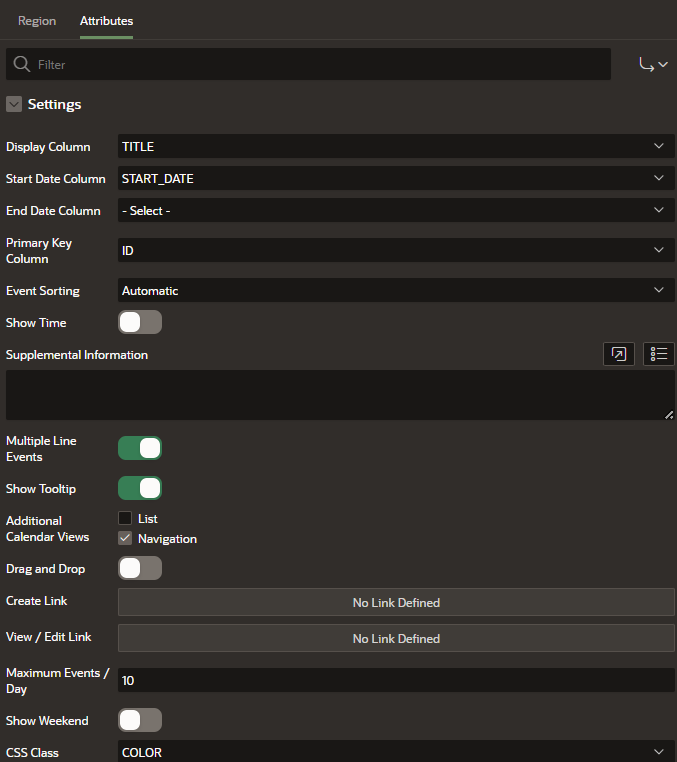
Below are the settings under Attributes for my Calendar region, it’s important you set the CSS Class attribute to our COLOR column:
2. Creating the Radio Group Item and New Region
Now, let's build the region for the radio group that will allow users to select a date.
Add a new region to the left of the calendar with a Column Span of 2 (though totally your preference on this). Mine is a Static Content region, using the Standard Template, and I’ve set the header to Hidden under Template Options.
Create a new item and name it whatever you’d like (PX_DATES)
Set the type to
Radio Group.Use the following SQL query as the List of Values:
select to_char(tour_date, 'fmDay, fmDD fmMonth YYYY') as d,
       to_char(tour_date, 'YYYY-MM-DD') as r
  from exp_dates
 where tour_date_id in (
   select e.tour_date_id
     from exp_dates e
     left join exp_bookings b on e.tour_date_id = b.tour_date_id
    group by e.tour_date_id, e.capacity
   having count(b.booking_id) < e.capacity
 )
 order by tour_date;
This filters out fully booked dates, ensuring users only are allowed to select available options. If you notice, I have converted the return date to YYYY-MM-DD. This is important as the HTML elements use this format for identifying the specific grid cell in the Calendar (this will make more sense when you see the JavaScript in the next step):

4. Create the Dynamic Action
Now, let's set up a Dynamic Action to jump to the selected date in the calendar.
Create a Dynamic Action on the radio group item (
PX_DATES).Set the event to
On Change.Add a True Action:
Action Type:
Execute JavaScript CodeFire on Initialization: Yes (so it executes if something is already selected)
Client-Side Condition:
Item is NOT NULLon thePX_DATESitem.
Use the following JavaScript code:
var date = apex.item('PX_DATES').getValue();
// Jump to date in calendar
apex.region('my_calendar').widget().data('fullCalendar').gotoDate(date);
// Unhighlight any previously highlighted dates
$('#my_calendar').find('.fc-day').css('background-color','');
// Highlight date selected
$('#my_calendar').find('.fc-day[data-date="' + date + '"]').css('background-color', '#FFFF61');
To gain access to our calendar we use: apex.region('my_calendar').widget().data('fullCalendar'). Oracle APEX uses the FullCalendar jQuery Library. When we use this selector, we have access to a wide spectrum of functions. I am using the .gotoDate function to jump to a specific date in the calendar. I then remove any previously highlighted date, and highlight the selected one from the radio group on the last line.
5. Create the Process for Booking the Tour!
Create a button to submit the page, and and an APEX Process (after form submission), use the following PL/SQL block to handle the booking:
begin
  exp_booking_pkg.book_tour(to_date(:PX_TOUR_DATE, 'YYYY-MM-DD'));
end;
Conclusion
Now if you select any of the dates in the radio group, you jump and highlight the date! Hit your button to submit the page, and there you have it!
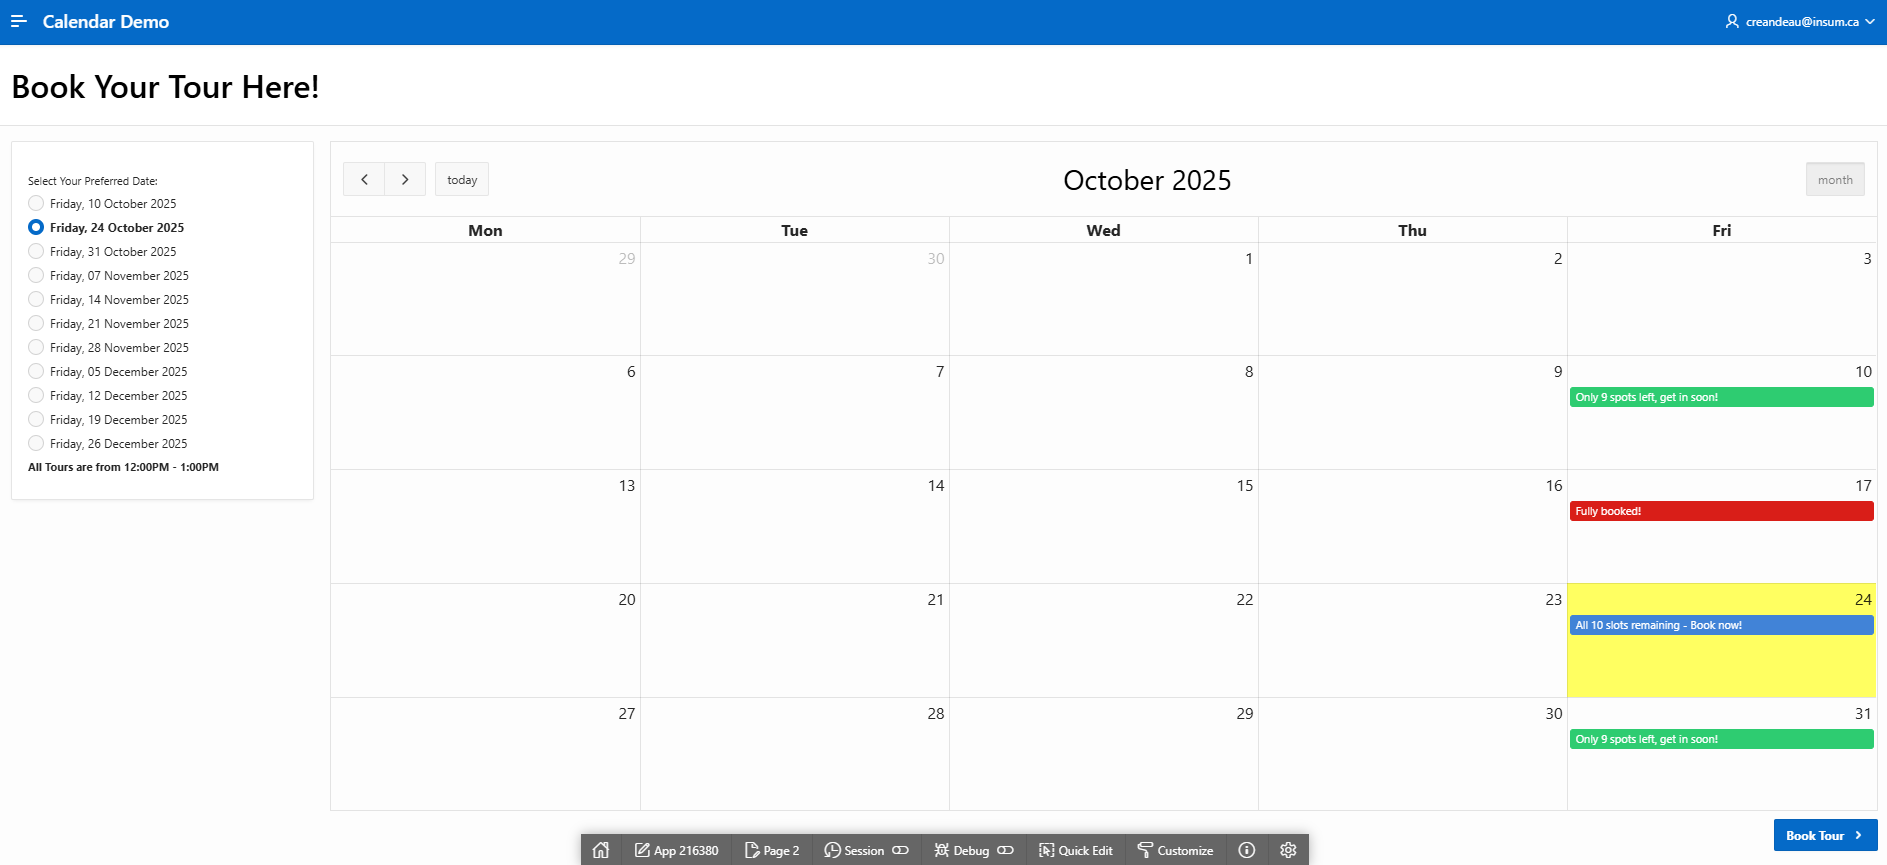
With this setup, you now have a simple Booking System in Oracle APEX. This would be great a starting point for a booking application of your own. Thanks for reading!
Comments
Join the discussionCody, this is great.
Since there are only specific dates and times available, using the calendar to display the choices instead of (what most people do) using the calendar to pick the dates and times makes for a much better user experience.